
Multi-Threaded Programming 5: A Lock-Free Queue Implementation
In the last post, we showed an example of a locking queue that used two locks in order to safeguard against being used by multiple threads. For this one, we are going to see what it takes in order to turn that into a lock-free queue and discuss why each of those changes has to take place.
Again, this is implemented using C++ and uses C++11 techniques compiling under Visual Studio Express 2013. This is partially a pet project to get more familiar with the C++11 conventions of doing things, so let me know of any thoughts regarding how I am doing in that regard.
Disclaimer: Any code that is provided is for learning purposes only. I make no guarantees that it will work for your specific project or platform. It has been subjected to some standard tests that it has passed on two x86/64 systems (one Intel and one AMD). All code is released under the MIT license, so feel free to use it however you see fit.
I strongly recommend reading the previous post if you have not, as this builds off that one. If you want to read that or any of the other things that I have covered, then here are the links to my series:
- Multi-Threaded Programming 1: Basics
- Multi-Threaded Programming 2: Communication
- Multi-Threaded Programming 3: Locking, Lock-Free, Wait-Free
- Multi-Threaded Programming 4: A Locking Queue Implementation
Unbounded Lock-Free Queue
We are going to stick with using a queue so that you can easily see the changes that have to be made in order to safely remove the locks. This leads to a lot more complexity and fragility, since everything has to happen in a specific order to guarantee that things keep working the way you expect. We will stick with an unbounded queue still, which will keep memory allocation as part of the implementation. Depending on the allocator that you are using, this may include locks, so you could easily argue that this isn’t a true lock-free implementation. However, there are memory allocators that make heavy use of thread local storage (such as Intel’s TBB allocator) that avoid these locks in most cases. I am also not protecting against possible ABA issues, mainly because I haven’t encountered them in my testing yet and so want to hold off on introducing code that would prevent that situation. In the next post, I hope to tackle these issues.
The basic design and logic of the queue remains the same as before. Again, this is to try and provide the reader with implementations that are as identical as possible except for their locking strategy. The interface to the queue is also likewise consistent. I am also sticking with using an int datatype for the examples, but will provide links to the full templatized code at the bottom. So stating that, let us look at what needs to change for a lock-free strategy.
Enqueue
As with our previous implementation, the first thing we do is allocate a node to store our data into. Then you will notice that we enter an infinite loop, which is a common strategy with lock-free code. While locking code will often loop waiting for a certain condition to be met, lock-free typically wants to at least make some progress with each iteration of the loop. If it is interrupting another thread, then a lock-free algorithm may help the interrupted thread get its work partially finished, so that when the current thread loops again it has everything in place to properly do its job. With our enqueue this may happen if we interrupt a thread which has added a node to the end, but not yet had the chance to update the tail. If the current thread notices the queue in this state, it will properly update the tail and then attempt to add its node.
Anyway, when we are allocating our node you will notice that we release the data from the unique_ptr instead of moving it. This is because the implementation of unique_ptr is not thread-safe, so we need to store the data directly by pointer. We could store it using a shared_ptr, which is thread safe, if so desired, but I am not doing that because the node is completely contained within the queue. Because of this, I know that nothing else will be touching the data or its location and so can use normal pointers throughout and save on some performance.
At the beginning of our loop, we get local copies of our tail and its next value (which should be nullptr). Because there aren’t any locks, the state can change at any moment, so we need to verify everything each step of the way. This is why we check to make sure our tail is still our local value and that it is pointing to nullptr as its next value. We then verify this yet again via a compare_exchange (which is a Compare-And-Set atomic operation originally discussed a few posts ago) when we go to set the next value to the node that we are adding to the queue. If this succeeds, then all that is left to do is to set the tail to our new node. However, if that compare_exchange doesn’t work, then all it means is that another thread already did that which is fine by us.
A quick note: Since this is intended for x86-64 which has strong memory ordering guarantees, then there actually isn’t any difference between the weak and strong versions of compare_exchange. However, if this were to be used on a platform with a weaker memory model, then I believe the way it is coded would be the best way to implement them.
Dequeue
For dequeuing our data using a lock-free approach, again we begin with an infinite loop. This time we store off the head value, the tail, and node that we wish to get the data from. With our locking implementation, we didn’t have to worry about the tail at all. However we have to account for the fact that something could be in the middle of adding to the list while we are attempting to remove from it, and so we might be in the best position to finish their work. We check for this possibility after discounting the fact that the queue is empty.
However, if there are nodes to get, then we find out where our data will be located, then attempt to remove the first node. Only if that succeeds can we delete the former head node and return the proper data. If we were to attempt to remove the head before finding out where the data was, then we could run into a situation where another thread then removes our data containing node and deletes it before we have a chance to get at it.
Node
Our node looks similar, but as mentioned earlier we are using a normal pointer to refer to our data. The other big difference is the use of std::atomic to refer to our next node. This is because we need to do atomic operations on our data in order to make our algorithm lock-free. It also enforces that we use the appropriate memory barriers when accessing our data. Because we are running on an x84-64 implementation, we only need to worry about the CPU reordering writes. This isn’t too important to protect against in this particular case because we do all writes as atomic operations, which won’t be reordered. The compiler might reorder reads or writes, however, so this is still somewhat useful for us so we make sure we aren’t surprised by any optimizations that it might do. So using the atomic variable type helps enforce the intended behavior for us no matter what we are programming for.
Recap and Next Time
As you can see, getting the ordering of lock-free algorithms correct is something that needs to be closely paid attention to. Moving to lock-free effectively squares your problem space, since you have to consider what every other thread might be doing at any point in the code. Handling this can be quite difficult, and it also means that you can implement some very subtle bugs even despite the best of care. So lock-free stuff should only be used in areas where there is a lot of overlapping thread traffic and you need the performance gain. But I hope these examples helped illuminate some of the processes that go on behind what is involved when writing lock-free code.
Next time we are going to look at how our locking and lock-free code operate in terms of performance. We will also see if we can get some more performance out of them by restricting the number of nodes since in games we generally have a good idea of how many nodes we might be working with, and how that might introduce other complexities.
Full Source
The full source for this can be obtained at the links below. This is a more generic, template based version of the code posted above so hopefully it will be a bit more useful for you.
Multi-Threaded Programming 4: A Locking Queue Implementation
You can also view this post on AltDevBlogADay!
We covered the basic differences between the various multi-threaded techniques to protect our shared data in the last post. Now lets look at some code that will implement a locking technique. I will implement this using C++ and will use some C++11 techniques compiling under Visual Studio Express 2013. This is also partially a pet project to get more familiar with the C++11 conventions of doing things, so if you see any ways listed to do things better using the new parts of the standard, please let me know 🙂
Disclaimer: Any code that is provided is for learning purposes only. I make no guarantees that it will work for your specific project or platform. It has been subjected to some standard tests that it has passed on two x86/64 systems (one Intel and one AMD). All code is released under the MIT license, so feel free to use it however you see fit.
If you want to read up on other things that I have covered, then here are my previous posts in this series:
- Multi-Threaded Programming 1: Basics
- Multi-Threaded Programming 2: Communication
- Multi-Threaded Programming 3: Locking, Lock-Free, Wait-Free
Unbounded Locking Queue
For this I am going to demonstrate using a queue. I chose this because it is a simple, useful data structure that everyone reading this should be familiar with. This simplicity also lends itself well to understanding and being able to easily follow what happens when we move this to a lock-free implementation in the next post.
It will be unbounded, so that it can grow to fit the size of anything we need to store in it. We are going to protect our shared data through locking by using a mutex. We will have a head node which is always valid but isn’t considered to have relevant data, and a pointer to a tail node which represents the end. So in the case when the head has a empty next pointer (or the head and tail both reference the same data), we know we have an empty list on our hands.
By always having a valid node, we can skip checking to see if head or tail pointers are null, at the cost of having only an allocation of an extra node. This also allows us to separate the enqueue and dequeue functions so that we can have separate mutexes for each operation, so then we don’t need to prevent enqueuing while dequeuing is occurring, and vice versa.
Under the hood, this is implemented as a linked list. This is reasonable since we are only ever adding to the tail and removing from the head and never traversing. This does incur the cost of an allocation for each enqueue, but we are not concerning ourselves too much with performance at this stage, so that is acceptable.
In the examples I am assuming that we only need to store an int (the data type is irrelevant for the actual algorithms), but in the code link at the bottom I have a template based version that I would actually recommend using.
Enqueue
Our enqueue function is very straightforward. It will allocate a new node to store our data in to. First we will begin by locking this with our enqueue mutex, preventing anything else from being added until we are done. Technically, we can do the allocation before this lock because that is a local operation and doesn’t affect any shared data. The lock_guard construct will automatically release the lock when it goes out of scope, so that we don’t need to worry about a deadlock situation where it never gets released.
Once we have our new node, we append it to the list by having the tail’s node set it to its next reference. Then we complete the operation by setting the tail as our new node.
Dequeue
Our dequeue likewise is easy to understand and follow. We immediately start by locking with our dequeue mutex so that no other dequeues can occur. We then check for the case where we are empty and return null if this is the case. When that isn’t the case we know that we have valid data to get and so we obtain it. We remove our old node from the list by setting the head to its next node and return the data to the caller. Since we are making use of automatic referencing we don’t need to worry about cleanup since that will happen automatically for us.
Node
There isn’t anything too special about our Node class. It is simply a container that holds onto the data that was placed in the queue with a reference to the next node. While I have it only accepting a unique_ptr for SetNext, I have the actual _next as a shared_ptr because we can get multiple references due to the tail in the main LockingQueue class.
Test
Now we have one of my tests that I used to make sure that the code I was posting actually worked. I am also posting this to give you an example of how this queue can be used by multiple threads (granted in an arbitrary way, but the concept remains).
All this code is doing is setting up separate threads for reading/dequeuing and writing/enqueuing to our queue. I split the amount of writing evenly between the threads as well as the amount of work that will be done by the reading threads. This is just to verify that everyone is getting a chance to do some work. So I simply split the data into separate arrays, one for each writing thread. Then I create my threads and let them do their thing. Afterwards, I verify that everything was processed successfully.
Next Time
For the next time we are going to look at a lock-free version of our unbounded queue. This will add quite a bit of complexity to our simple, humble queue here, but not enough to make it unmanageable. As you will see, the order of operations is extremely important when it comes to dealing with lock-free algorithms.
After that, we will do some profiling on our two implementations and see how they compare. We will also see if there is anything that can be done to optimize them (hint: there will be). Talk with you then!
Full Source
The full source for this can be obtained at the links below. This is a more generic, template based version of the code posted above so hopefully it will be a bit more useful for you.
Multi-Threaded Programming 3: Locking, Lock-Free, Wait-Free
You can also view this post on AltDevBlogADay!
Now I want to cover the basic terminology used when talking about concurrent algorithms. This will be helpful so that you are familiar with the available techniques you have when you have multiple threads operating together. The term concurrent itself refers to an algorithm that can scale from being synchronous on a single thread to utilizing multiple threads at the same time. The terms I am going to cover also exist independently of any architecture, though the actual implementation will vary due to the underlying hardware differences. I am going to cover them in order of increasing difficulty to implement, so if you are interested in implementing an algorithm of your own, I would suggest starting with the simplest implementation and moving on only as needed.
If you want to read up on other things that I have covered, then here are my previous posts in this series:

Locking
In the previous post, we ended with an example of a mutex lock. This is the easiest and most straightforward method available in order to restrict access to a particular area of code for only a single thread at a time. However, as you may have surmised, it will also have the worst performance when dealing with many threads all accessing the same area at once. This is because the threads are restricted to operating serially, so you basically have given up on the performance benefits of using multiple threads for the area where you lock. But if it is an area that is accessed infrequently, or there is only a small chance that multiple threads will be in the locked area at the same time, it can easily be a “good enough” solution.
Locking is a good first step when you are dealing with data that can be read and modified by multiple threads. As we saw with the explanation of caches, when you modify data on one thread that change will quickly propagate to other threads that then read that data. However, the trickiness lies in the fact that these modifications can occur at any point within your algorithm. So by forcing the algorithm to operate in a serial manner we prevent any unexpected changes that can occur and disrupt what we expect to happen.
While debugging mutex locks can be fairly simple (as far as threading problems go), there are several ways that things can go wrong. If you are using locks and find that program has stopped responding, simply pause it and examine it in the debugger. Chances are that one of the following three things has occurred.
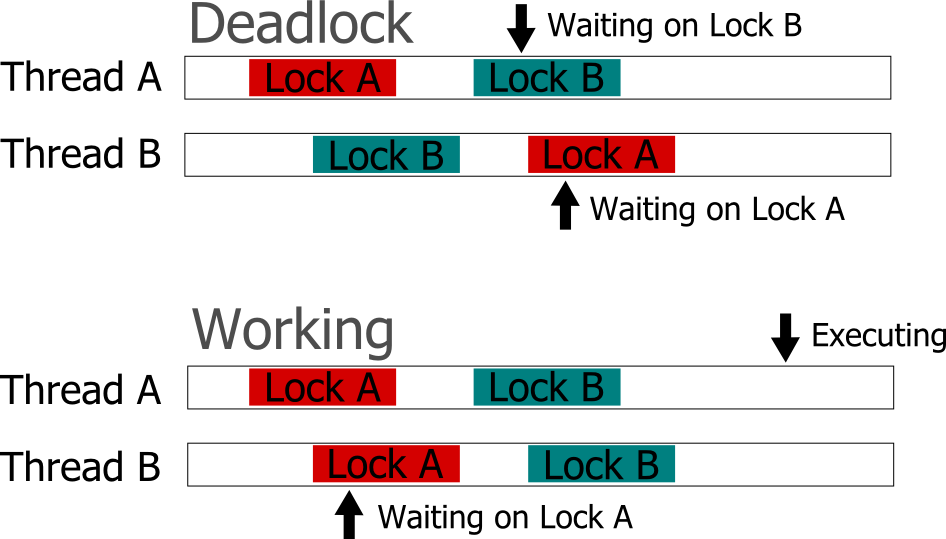
The first pitfall you might have fallen into is what is referred to as a deadlock. This occurs when the operation of your program results in such a manner where a lock is obtained but is never released. This causes your program to halt because no further progress can be made because all the threads are waiting on something that is never going to happen.
One cause of this can be due to not acquiring locks in the same manner in different places in your code. So if you acquire Lock A then Lock B in one place and Lock B then Lock A in another, you can get in a situation where one has Lock A locked and tried to lock Lock B, but can’t because Lock B has already been acquired. Since it has Lock A already, the thread that is holding Lock B cannot get it and so never unlocks Lock B. If you acquire the locks always in the Lock A then Lock B direction, then you can prevent this problem from ever occurring.
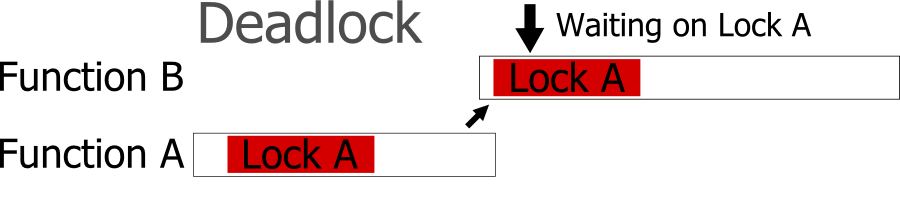
Another cause is simply attempting to use the same lock in multiple places, but you have code that calls to lock multiple times without a resulting unlock. You can easily design a re-entrant mutex that can handle this sort of use case if desired, but make sure that this behavior is what you want.
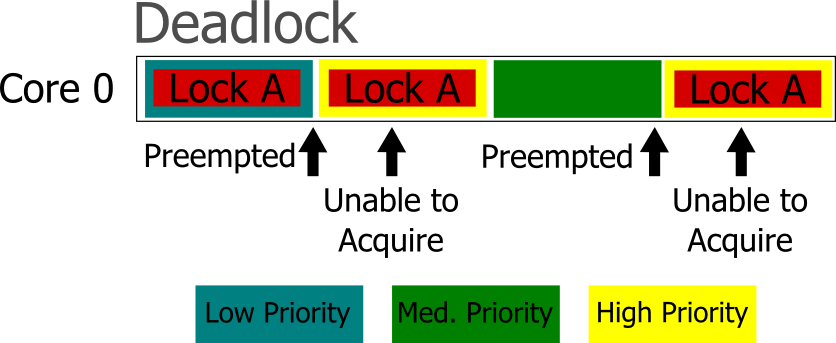
The final case that I will cover is likely the hardest to ascertain. When you have multiple threads of different priorities, you need to be careful when it comes to sharing locks. If you have a case where there is low priority, medium priority, and high priority thread, and the low and high priority threads both execute in the same critical section, then you need to be wary of priority inversion. If the low priority thread gets the lock, then gets preempted by the high priority thread, then the high priority thread will not be able to acquire the lock. So the execution will then fall to the medium priority thread (assuming the high priority thread isn’t busy waiting). This isn’t just some idealistic fabrication, it happened to the Mars Pathfinder. There are certain techniques that an OS might use, such as random boosting in Windows, that can help avoid this situation for you.
Lock-Free
When using atomic operations, we are also forcing a linear execution on our program, but in a much smaller scope. However, they do not fall prey to the things that can go wrong when using locks. Therefore, if we are not using any locks, then our program will always be able to advance. If our algorithm is guaranteed to never wait (even if it has to repeat some of its work), then it is considered a lock-free algorithm. Another way of thinking about it is if you were to arbitrarily pause any thread that is in your algorithm, it will not affect any of the other threads in there.
However, when dealing with lock-free algorithms, even though you do not need to worry about deadlocks as described above, you have a whole new set of problems. The main issue when writing code that doesn’t force linear execution for large sections is that almost anything can happen at anytime. When thinking through the code, you have to take into account that any other thread can come along and perform operations, such as changing a variable, adding / removing a node, or reorganizing the data. Because of this, it is common with lock-free algorithms to continuously test the assumptions before performing an action. If the assumed state is incorrect, then lock-free algorithms typically will loop and repeat their work until they can safely proceed. So, if an area of code has low contention, then using locks might actually lead to faster execution.
However, just testing the state isn’t without its caveats. One particularly nasty thing that can happen is known as the ABA problem. The idea here is that even if you are making sure that you are operating on the same address, by testing it with a Compare-And-Swap atomic action, it can still fail. If the address was recycled in some way (such as being deleted than allocated again, or popped then pushed again) then even though it is at the same location, it is not the same data. This can lead to crashes or lost data, and is very difficult to track down due to the fact that it can be extremely rare.

Wait-Free
Now, if you have an algorithm that will never repeat work and will always advance, then you have a wait-free algorithm. Because of their properties, they will always finish in a fixed number of steps. These can be exceedingly difficult to implement and it is rare to actually see them in use, though technically any algorithm can be translated into a wait-free one. Unfortunately, their performance is typically slower than their lock-free counterparts (though sometimes they can beat the lock-free one under certain circumstances). This means that for games, where performance is typically the highest goal and the number of threads is low, lock-free algorithms are generally the best option for highly threaded, time-critical areas.
Final Considerations
Never underestimate the power of a “good enough” solution. Because multi-threaded programming carries with it a high chance of hard to detect bugs, a tiny bit of performance tradeoff for a more stable codebase can definitely be worth it. Therefore, it is actually good practice to start with using simple locks to protect shared data. Then, when you are certain that those locks are a bottleneck, investigate into lock-free solutions. Also, because writing good lock-free algorithms can be difficult, it is usually a good idea to keep an eye out for already implemented libraries that you can make use of. These will help reduce possible implementation errors, since simple tests might fail to catch all the problems that can occur. Especially since the issues can be very dependent on rare, timing specific situations.
It is also a very good idea to redesign your code so that you minimize the areas where multiple threads can interact with each other. This gives you the benefits of parallelism without many the issues that can occur (such as all those described earlier). We will look at ways to do this later in the series, but I wanted the reader to first be familiar with some of the difficulties that can come with multi-threaded programming. That way, if you encounter a situation where you have to worry about multiple threads executing on the same data, you have a good grasp of the problem space going into it.

Next Time
For the next post, we are going to look at a basic locking queue implementation. For the post after that, we will then see a lock-free queue implementation where I will cover why we need to make the changes that we did in order to convert it. For the following post, we will see if we can optimize the lock-free queue further, and some pitfalls to watch out for while doing so. Because of the difficulties with wait-free algorithms and the fact they typically don’t have much real-world benefit, we will not be covering those further.
Further Reading
If you want to read some more about locking, lock-free, and wait-free algorithms, feel free to check out the following areas:
- Preshing on Programming: An Introduction to Lock-Free Programming
- Lockless Programming Considerations for Xbox 360 and Microsoft Windows
- Bruce Dawson: Lockless Programming in Games
- Atomic<> Weapons: The C++11 Memory Model and Modern Hardware
- The Art of Multiprocessor Programming
- Is Parallel Programming Hard, And, If So, What Can You Do About It?
Next Post – Multi-Threaded Programming 4: A Locking Queue Implementation
Multi-Threaded Programming 2: Communication
You can also view this post on AltDevBlogADay!
The next step in learning about multi-threaded programming is going to involve seeing how threads communicate with each other. This is important so that it is understandable why many of the pitfalls when programming with multiple threads exist. I am going to stick with x86-64 based architectures for simplicity, but this is pretty applicable to all computing devices from my experience.
If you want to read up on other things that I have covered, then here is my previous post in this series:
Reading From Memory
So to start, let’s see what happens when a thread reads from memory. First, the processor will request a load from a specified memory address to store it in a local register. Since we are just dealing with a single process, I will avoid discussing the details behind virtual memory addresses and TLB, so just consider this a physical memory address.
This will then hit various data caches to see if this address exists in them. It is actually pretty common for a modern multi-core chip to have 3 levels of cache. With each level of cache, you get more storage available, but also longer access latency. These later caches can even be shared by multiple cores. We will go with the worst case scenario in that the address does not exist in any of the caches, which is known as a cache-miss. If it had, then it would be called a cache-hit and the data at that address would get to the core much faster.

In this case the L1 and L2 caches are specific to each core.
So after the address has made it all the way to the main memory of the computer, the data at that location begins its long trip back to the processor. Note that in the real world with virtual memory addresses, the location of the data could actually be on the hard drive, meaning that we need to wait for that slow thing to locate what we need before we can get access to it. Along the way back to our waiting core, each level of the cache is updated to have that data stored, so that any future access to it will be much, much faster.
Because each trip outside of the caches is slow, a single read will pull in data around the address requested. The size of this data is equal to the size of a single cache line, which is typically 64 or 128 bytes. The cache works by dividing memory up into aligned cache lines and storing those, but the specifics of how that might occur is beyond the scope of this series. It should be noted that in the case of any shared caches, if one thread pulls in data into the cache that it will be available for any other threads that might also need to read that data. So it can actually be useful if multiple threads are reading from the same data since the first thread will pull it into the cache and then the other threads can benefit from that. Though since cache layout is pretty specific to the type of processor (and the core that is executing your thread can potentially change unless you adjust the affinity correctly), this type of optimization can be difficult to actually implement.
I stands for Instruction, AKA code. D is for Data.
Writing To Memory
A program is pretty useless without writing something back to memory, so let me briefly cover what happens when a thread does just that.
It starts by specifying what data to write and specific memory address to write to, just like with the read earlier. The core will execute this write instruction (typically referred to as a store), which will be put on the memory bus to head to the caches. The caches will snoop the bus to see what address is being written to, and will update their entries accordingly. Only after the cache line that has the updated data needs to be replaced will the updated data finally make it to main memory. Fortunately, the thread that executed the write instruction doesn’t need to wait until the write completes before moving on to the next instruction.
One thing you do need to keep in mind is that with modern Out-Of-Order CPUs (and compiler optimizations), the order that you write the code in is not necessarily the order that it will execute in. While there are guarantees in place that will make the code functionally work the same as you initially told it, these do not apply when it comes to other threads. This is done to compensate for the delays that occur due to the time it takes for data to come from (or to) the cache. You do have the ability to put in memory barriers (also known as memory fences) that will signal to the compiler and the processor to not do this. This will become important later on once we have multiple threads in the mix since we will need to coordinate their actions and enforce the order that certain steps perform in. Also note that you should not confuse memory barriers with the keyword volatile, which in terms of multi-threading in C/C++ (which I will be using for examples in later posts) doesn’t help you accomplish this.
When multiple threads are writing to the same data location, whoever executes last is typically the winner (the actual behavior may depend on the underlying hardware). However, since threads are controlled by the operating system, guaranteeing which one that will be is nearly impossible. So you have to be extremely careful whenever you have multiple threads writing to the same area. Fortunately, we have a few tools that will help us do this, which I am going to cover next.

Atomic Operations
Finally, we are going to touch on a vital piece of communicating between threads, and that is atomic operations. As I just mentioned, when dealing with multiple threads operating on the same data, guaranteeing the order of operations is nearly impossible. Even if one thread is executing ahead of another, that thread can be preempted and then fall behind. Naturally, this can happen at any time completely outside of your control. Additionally, a thread can stall waiting for a read or write operation (say one thread hits the cache and another doesn’t). So you can never rely on a thread being first or multiple threads being organized in any such fashion without synchronization abilities. Atomic operations fill in this important role. These are implemented directly on CPUs as operations that cannot be interrupted (performing multiple operations in a single instruction with specific constraints), so they will operate in a serial manner regardless of other thread or operating system interference.
The fundamental atomic operation is the Compare and Swap. What this does (as the name implies) is that it performs a compare of the data before swapping it with different data. This is so you know that you are operating on data that has not changed (since another thread could have come by and beaten you to the punch).
Let’s look at a simple example of an increment using some pseudocode. Assume we have a Compare and Swap function called CAS that returns a boolean indicating whether it was successful:
// our function signature
bool CAS(void* AddressToWrite, int CompareValue, int SwapValue);

static int x = 0;
local int y = x;
while (CAS(&x, y, y + 1) == false)
{
y = x; // fetch the new value
}
Assuming this is in a function that can be called by multiple threads, we need to protect against the possibility that any other thread can change the value of x from the time we read it into our local variable to the time we increment it. If that does happen, then we need to read in the new value and try again, keeping in mind that we can be behind yet again due to some other thread. However, we should eventually succeed unless we find ourselves in some situation where other threads are continuously hitting this section of code, which in a normal program would be neat impossible.
Also using our Compare and Swap function, we can implement a simple mutex lock. We can have a variable that will act as the lock value. Then we can attempt to acquire the lock by seeing if that value is 0 and then setting it to 1, and releasing the lock in a similar but opposite manner. Some psuedocode for those is below.
Lock:
static int lock = 0;
while (CAS(&lock, 0, 1) == false);
Unlock:
// technically this should always succeed assuming
// we successfully locked it in the first place
while (CAS(&lock, 1, 0) == false);
Next Time…
For the next post in this series, we are going to look at a couple of different simple algorithms and see how we can use what we have learned here in order to make them operate in a multi-threaded (or concurrent) manner.
If you have any interest in other areas dealing with multi-threaded programming, please let me know in the comments and I will see if I can make a future post answering any questions or topics you would like covered. Thanks for reading!
Next Post – Multi-Threaded Programming 3: Locking, Lock-Free, Wait-Free
Multi-Threaded Programming 1: Basics
You can also view this post on AltDevBlogADay!
This will be a series of posts in which I will cover a good portion about what I have learned in terms of multi-threaded development in the realm of video games. I am writing this since I have been inspired by informative series of posts here such as Alex Darby’s Low Level C/C++ Curriculum. So my goal is to explain how multi-threading works at a low and high level, as well as looking at a few common scenarios that can benefit from these techniques. I might even touch on a few situations you can get yourself into and some techniques for debugging them. I hope you will enjoy reading about it as much as I enjoy discussing it.

I am not the first person to make this joke…
What is Multi-Threading?
Lets start at the very beginning and cover exactly what a thread is and why having more of them (up to a certain point) is a good thing.
Every program that runs on a modern computer (such as your PC, game console, or smartphone) is a process. These can have child processes as well, but for simplification I am not going to cover those. These processes can have a number of threads associated with them. These threads are what execute the actual code for the running program. Threads run code independently but share memory. This allows them to operate easily on the same data but perform different calculations. The fact that they share memory is the powerful, double-edged sword of their functionality.
A modern CPU is typically composed of several cores. Each core can run one thread at a time (though hyper-threading can sort of run two interleaved, but I am going to ignore that for simplicity). The way that a computer with a single core simulates multitasking is that the operating system can switch between threads at will. So while only a single thread can be executing, enough are getting a chance that everything appears to be running simultaneously. This means that if your program wants to make full use of all the available computing resources your CPU has, you don’t want to have more threads than it has cores, since you will be switching between executing your own threads. This switching between executing threads is called a context switch, and while it isn’t exorbitantly expensive, you still want to avoid it as much as you can to achieve optimal speed.
The main parts of a thread are the program counter and other registers, the stack, and any accompanying local data storage. The program counter keeps track of what part of the code it is currently executing. The registers keep track of the current values of the executing code. The stack holds any values that don’t fit in the registers. And the local data is program specific, but generally keeps track of data that is local to that thread. This local storage is accomplished via a lookup table, managed by the OS, that will have each thread look up into its specified index to see where its data is kept. In short, this allows you to have variables that you can access like a global, but are in fact unique to each thread.
So, taking into account all of this, multi-threaded programming is when you use multiple threads in your program. Typically, you are doing this so that you can execute your program faster than you would using a single thread. Another common usage is to separate out your UI from the rest of the program, so that it always feels responsive. The difficulty in doing so lies in designing the systems in such a way that they can make use of multiple threads in these manners.
Show me your cores!
Why do we need it?
In short, we need this in order to make the most use of the available resources. But the real question is more likely, “Why do we need it, now?” and this is due to the trends in computing.
Since the dawn of the CPU, as years have gone by hardware manufacturers have been able to increase the speed of computers by increasing their clock rate. However, a little less than a decade ago, consumer products topped out around 4GHz for awhile. A lot of this was likely due to the effects of electromigration since CPUs were getting smaller and also as the frequency increased they were releasing more heat. While we are now getting processors that are reaching 5GHz for consumer use, that left ten years where chip designers had to think laterally. And this means that one of the key innovations was putting more CPU cores onto a single chip. So no longer could you expect your games to be faster just by putting in new hardware, you had to design the game so that it could work well using multiple threads running on multiple cores.
One of the first areas where multi-threaded computing required games to adapt was with the release of the Microsoft Xbox 360 and Playstation 3, and for two similar but different reasons. The 360 had three cores with Hyper Threading technology (HTT), meaning that it could conceivably run six threads in parallel. The PS3 had a single core with HTT, and seven Synergistic Processing Elements (SPE), in a new architecture called the Cell Broadband Engine. The 360 had unified memory, so that all the threads could access all the memory. This made it easy to implement multi-threaded applications since you didn’t have to worry about who could access what, unlike with the PS3. Each SPE there had only a limited amount of memory that it could make use of, meaning that as a developer you had to carefully design your algorithms to take this into account.
Also, from a pure performance standpoint, the CPUs in the consoles were slower than their traditional desktop counterparts. While they were clocked similarly in speed, they were simpler chips that didn’t have a lot of the fancier technologies such as Out-of-order execution that made the most of the available power. So this forced developers to cope with multi-threaded strategies in order to make their games stand out amongst the rest.
In the desktop world, multi-core CPUs were quickly becoming the standard, but it appeared that developers were slow to adopt their programs to make use of the additional cores. A lot of this was likely due to two main factors. First is that the desktop world has a much broader range of hardware to support, and so they tend to design with the lowest common denominator in mind. Meaning that they wanted to support older systems that likely only had a single core available. Second is that multi-threaded programming is more difficult, and it takes a different approach to handling it. Couple this with the fact that a lot of game teams tend to reuse technologies, so in order to take advantage of multiple cores a lot of things would have to be rewritten. Also, graphics tended to be a big bottleneck in games, and submitting all the stuff for the GPU to draw was restricted to being done in a serial manner by the APIs (DirectX or OpenGL, typically). Only with the latest versions of the APIs (released only a few years ago) has it really been possible to make the most use of all the available cores in modern CPUs. And now with the latest generation of consoles upon us, developers have no excuse to not use heavily multi-threaded game engines for the top tier games.
Next Time…
For the next post in this series, I will cover how communicating between threads works on a hardware and software level. This is important to understand what is exactly going on with the CPU in order to avoid many of the potential pitfalls that are inherent in multi-threaded programming.
If you have any interest in other areas dealing with multi-threaded programming, please let me know in the comments and I will see if I can make a future post answering any questions or topics you would like covered. Thanks for reading!